After the forced Hiatus of the fuel pump, it's time to crack on with something on the van, I think I need to fit the vinyl floor next and drill through it to fix everything, but I'd need to fix the fresh and waste water plus the LPG tank and repair the floor so it's not obvious where the holes were through thin vinyl....but I digress....
Got stuck into the rear seat/bed units, I'd like to say for the record I'm not a carpenter and I'm not particularly great at it, but I do get some satisfaction when it goes right and this has just about been spot on, I'm sure mk2 would be better but mk1 will suffice!
I've decided to keep each unit separate so they can be moved, otherwise the side of the bed could be part of the kitchen unit.
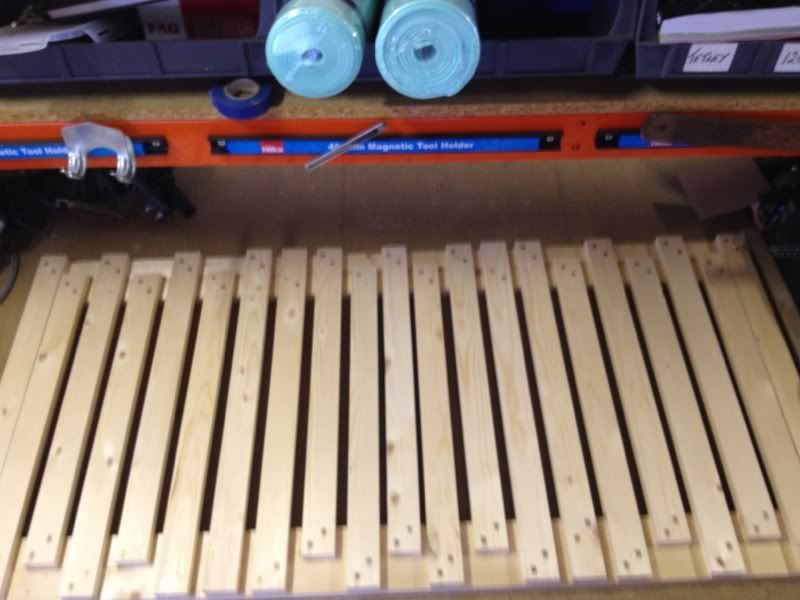
Built the slats (a copy of Deep Reds so many thanks for the excellent pics online).
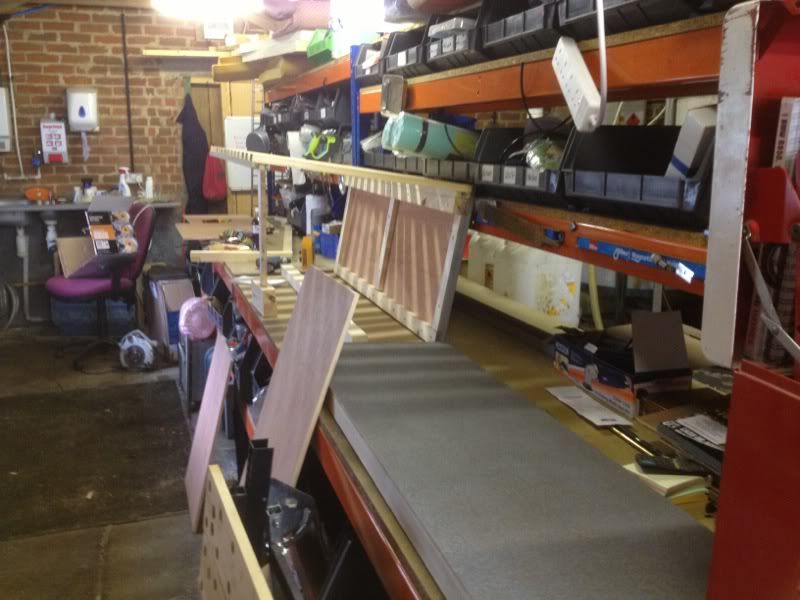
Then the sides were made from 12mm ply, I'd love some lightweight furniture board in maple, but it's expensive and tricky to ship, so ply it is with 'Flecstone' paint in 'Manhattan Mist' over grey car primer (saves 20% of the expensive flec paint).
There is a painted panel in the foreground of the pic and I'm fitting the hinges (productive day as I made 1000 litres of Diesel too!)
Biggest problem I'll have now is once SWMBO has seen this I'm sure I'll have more carpentry to do, starting with replacing a sorry looking wicker washing basket, I think it will be a chute top for 'underpants basketball' ;-)
Tuesday, 9 October 2012
Fuel pump issues & new skatebord.
Well there's been a delay as the Transit fuel pump died, pretty much wrote off a month and pulled the pin on getting alternative transport so it's not used as much, particularly when finished.
Enter a MX5, no I'm not getting into hairdressing, it's cheap to buy & insure as a second vehicle. Japanese reliability and a bomb proof engine that will be seeing forced induction most likely a supercharger as I love the noise!
Pretty straight for a 1995 car and lots of fun to rag the nuts off with the roof down, this plus I was 40 last Saturday.....a mid-life crisis.......moi!?
Sunday, 22 July 2012
Body coloured heater flue
Right, bit stalled by weather and the need to fix exact position of
kitchen, side ply has been screwed in and the edges sealed with
Polyurethane glue, great as it expands like a mini version of the foam
(guess that is what it is) I added a quarter circle bead to the top to
help bond it in and break the bend for the carpet.
Postman has been a constant purveyor of gods from the far east recently, so getting the important bits in a row as it's expensive when you need them 'now'....
Got stuck into getting the Carver Cascade 2 looking a bit inconspicuous (well as much as a 8x10" lump can) The 'ETIS' site from Ford told me I had a 'Moondust' Silver Transit so off to the local factors for 3 cans of spray; plastic primer, colour coat and the all important lacquer.
For those who have sprayed plastic I'll accept a sage nod, for those who have not, consider plastic to be an evil fiend that hates you and your paint!
Disassembled the vent to get paint inside the frame or there will be white still visible, annoyed a couple of spiders and got to cleaning/rubbing down with a mix of red scotchbrite and paper, being nice and hot the 3 layers could go on in quick order, I'd also have used etch primer, but it's yellow and the plastic primer should be kinder to the plastic.
Dust coat of primer, then build, allow to almost dry and stick in the sun (yes when you read this tomorrow, we had summer yesterday!), cup of coffee and then repeat for top coat (note the Hycoat paint I used comes out like a hose compared to the primer and lacquer) dry the same, and checking the spiders are not stuck to it, whack the lacquer on. When dry (give it a few hours, pop it back together or wait overnight for the paint to cure hard, I was bored so on it went!
I'm pretty happy with the result, I'd have loved a Truma Combi or Ultrastore for a small round flue, but as I had this, it's a financial choice, £300+ for a second hand ultrastore will go much better elsewhere!
Monday, 9 July 2012
Ply lining
Today the second leak got sorted, "Creeping crack cure" to get it watertight, then it gets a new bead of sealant tomorrow.
Walls have had ply cut to size (couple to finish) and van looks better for it.
Top edges will get a beading glued across between ceiling and walls to add stiffness and soften the line as its a bit abrupt.
Saturday, 7 July 2012
Caragone...
Caravan went today so the drive is now clear, sold as a rolling shed for £100, then sold the hitch for another £100 to the same guy as it was to be removed but towed so well with it on.
Carver water heater was tested yesterday and works okay, the oven blew a seal so that's going on eBay as spares repairs as I'm fitting a combined microwave. I had/have no intention of selling any gas appliance as anything but spares or repairs as they should be looked at by a professional, not just "it works must be okay"....
Bye bye Celotex....Hello ply
After almost a week of looking like an oven ready chicken/space capsule it was time to cover the celotex, solar mounts and about 3 tins of expanding foam.
I've gone for 5.5mm ply over the 3.6 as it's a bit stiffer and I'm glad I did as it still tries to wander around following the tension of the screws etc...
I decided to ignor the option of a full sheet with a 150mm strip as that was going to be a pig to fit a full sheet with a roof-light and cables to allow through. I just split the van down the middle and used 4 sheets instead of 3 with large off-cuts I can use as the bed bases etc...
Bit of jiggery-pokery with scribing in the front and rear, some went without a hitch some must have been stretching between the jigsaw and roof!
All glued (Stixall clear) and screwed into the wooden battens.
Van has now become much darker, but the light grey (silver they call it) carpet should keep it light, that's a epic for another time!
Leak!
Bum!
Looks like a seal has failed on the original roof not the roof-lights, probably when it's flexed under my (cough) weight....
Got it in the barn and gave it a rinse through with brake cleaner, bit of heat and it was clean and dry, the sealant says it can go off under water, solve world peace, time travel etc... as they all tent to claim; but that's under ideal conditions.
A good squidge in from above plus build a new sealant 'bead' then squidge another blob inside working it into the crack with my thumb and it's better sealed than Ford delivered it!
Will be keeping an eye and have ordered a large bottle of 'Creeping crack cure' to go over the rest as a preventative repair.
Thursday, 5 July 2012
Cold war preparations!
With all the Solar panels in and the roof-lights watertight, I've been getting stuck into the wiring and insulating the van....and 'de-squeaking'....
I've added an Aerial cable and glued it to the underside of a roof plug ready for an aerial or sat dish in the future, the 4mm solar panels are ready to wire and the MPPT solar controller has arrived today from China.
It's starting to look like the inside of a space ship or the laughable 'safety' measures of the 60's and 70's that were to protect us from radioactive fallout!
Friday, 29 June 2012
Roof lights and Solar sorted
Been a busy week, had a few days of dodging he rain but managed to fit in getting the 2 roof lights in and got the rails bolted down for the 2x 80w solar panel ordered from Germany. They arrived just as I was packing away, so popped them on and wired in parralel to an IP67 box on the roof ready to wire back to the MPPT controller when that arrives from China.
Managed to get 2 (yes 2!) 12v compressor fridges, but had to collect from Norfolk, with a detour for 2 water tanks in Milton Keynes it was a 420 mile trip!
Wednesday, 20 June 2012
Dodgey donor...
Sunday, 17 June 2012
Propane or Pro-pain?
I'm keen to keep the LPG/Propane kit outside the van, the problem is that I have a refillable LPG bottle but not a chassis mount tank. I've been given a tiny 4 litre kit off a moped that is vapour take off (need this as most cars etc are liquid with a tube to the bottom of the tank like a trigger spray disinfectant bottle).
The moped had done 4 miles from new factory fit LPG and was sold for £100 as it never worked properly, having found it's got a vapour multiport I'm not surprised!
Safety and risk assessment aside (you must satisfy yourself that any LPG work carried out is safe, certified and inspected by a qualified person), I plan to swap this multiport onto a larger tank, the issue is that I will be removing the plunger from the solenoid valve as it wants to draw an amp at 12v all the time the gas is on. I'll be sticking to the manual valve used on calor bottles etc, for decades.
Again all this must be safe, I'm very lucky as I have the help of a friend who is LPG certified and have a VERY good LPG parts shop locally.
Multi-valve...
Tank...
I should be able to get a vapour system for very little cost, I will need to get a frame made to bolt through the floor and this needs to be sorted with the waste and water tanks.
Getting stuck in...
Got some of the lining out, space to put stuff is going to be fun but I have a donor caravan coming so not too bad....YET!
Battens were screwed in with stainless self drilling screws (APEX fasteners in Slough trading estate to be highly recommended, no minimum order you could ask for 3x 1" screws!). I think I need to wean myself off B&Q as it's going to get expensive unless I use a decent (cheap) supplier. I'm avoiding Wickes as all their stuff is tat, wood that is twisted, bent and full of knots.
Not exciting but it's a start!
The rear step was removed so I can tow a trailer (I can have a 7 ton gross train weight!), found a new BRINK tow bar for £60 delivered on eBay and it was heavy but not too bad to fit, though air tools were handy.
Design and kit is still in a state of flux until I get the donor and know what I'm working with but.
Starting out....
Having picked up our Jumbo a while ago it got coerced into being a collection vehicle for a Biodiesel collective, but that had a finite limit as that was never the idea. Another delay was letting a friend use it for his Solar work in late 2011 as he tried to get all his installs done before the government cut-off date.
Still now the sticky/smelly tanks are out I'm cracking on, the bulkhead came out and now I find I'm looking around like I can see through the back doors to reverse (I've had enough vans to know better...DOH!).
I've got a decent amount of room to play with...
Still now the sticky/smelly tanks are out I'm cracking on, the bulkhead came out and now I find I'm looking around like I can see through the back doors to reverse (I've had enough vans to know better...DOH!).
I've got a decent amount of room to play with...
Subscribe to:
Posts (Atom)